How to Evaluate Athletes with Performance Testing
You need to know that assessment involves the idea of KPIs. Key performance indicators. KPIs are very similar across all athletics. You may ask, “How is the KPI similar for a wrestler and a football player?” That is a great question. You need to break it down to where the successes can occur, where athletes will be prone to injury, what twitch type the athletes have, and even what type of personality the athlete has. All of this information lets you assess an athlete's athleticism.
You want to assess mobility, twitch type, endurance, structural balance, movement mechanics, and the athlete’s personality.
Mobility Specific
The athlete assessment you are learning about in this blog is specific to athlete performance. If you want to get tested by a professional, go and do that to get every precise aspect around mobility.
In the interim, you want to start by using a technique stick and establishing an overhead position as if you were receiving a snatch. The second step involves you putting the bar overhead. As a coach, you now want to see the athlete squat with the technique stick overhead. You want to just throw the athlete into the process to see what happens. You are not just assessing the movement. You also need to be assessing everything the athlete says or doesn’t say to you. The minimal instruction broadcasts to you how the athlete thinks through their reaction.

As the athlete overhead squats, pay attention to every fidget that occurs. For instance, you may see an athlete trying to move their feet. You may see an athlete come forward. This may indicate a tight upper back or a lack of ankle mobility.
From there, you will use a PowerLastic band with the technique stick slid through the handles. The increased tension from the band forces more activation from the upper body. You want to assess from the side and pay attention to the athlete’s line of movement. It needs to be a really simple eye test.
If you don’t have a coach, film yourself and assess to see where potential areas to remediate exist. Just keep it simple. Don’t go crazy with it.

Unilateral Mobility
A great part of testing and assessing athletes is not letting the assessment paralyze your thought process. You need to roll right after the assessment. Don’t spend a week or two assessing and not getting work done. Take a day and get athletes training right away.
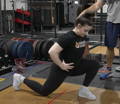
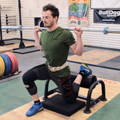
You will want to do a split squat for the unilateral mobility test. Keep the heel down and let the knee drive over the toes. Give minimal cues. However, if you give a cue, pay attention to how the athlete adjusts their body to execute the cue.
Being a unilateral movement, you want the athlete to do the movement on both sides. Remember also that none of the information is good or bad. It just is. It is information you need to log for when training begins.

Continuing with unilateral mobility, you want to next do a single leg RDL, making a point to touch your foot with the hand of the leg going behind the torso. You want to touch and come back up. You also want to twist from the torso to touch the foot. Do it with both sides.
Again, minimal coaching. You will start to see things being exposed. The body is learning the test from rep to rep. In all movements, especially with rotational unilateral movements, you will notice things that need to be cued and taught.
Dumbbell Bench
You need to understand that at Garage Strength a lot of the athletic assessment we do is contained within the first workout of an athlete walking through the doors.
That athlete walking through the front door will be doing a lower body or upper body day. What you have read so far focused on a lower body day. The dumbbell bench is an upper body movement that can show shoulder strength to tricep strength and display an athlete’s twitch type.
As is the running theme in this assessment, you give minimal cues during the assessment. With the dumbbell bench press, you want to first notice if the athlete uses a stretch-shortening cycle or just does a strict press. You have to be aware that the stretch-shortening cycle can be taught. Also, notice if the elbows start to come in during later reps. If that happens, you can be certain the triceps are stronger than the shoulders which will influence programming later down the line.
Twitch Type
Don’t say anything in this part of the assessment of the athlete. You just want to see how they react and handle things.
With a 20-inch box, have the athlete jump on the box. Then have them jump down and back up. The athlete may just step down and jump back up. Log that. You should now know that you need to be precise on cues for an athlete who would do this.
Once the athlete jumps off, lands, and jumps back up right away, you can see how the athlete cycles. Pay attention to the length of the ground contact. Also, notice if an athlete steps back or gives a little hop on the landing before reacting to jump up again. Every piece of movement is an input of information within the assessment.
The twitch type test is simple. Use a box or use steps. Know that athletes who respond with minimal cues and react quickly will probably be your better athletes concerning genetics. It doesn’t necessarily indicate work ethic and coachability.
With more advanced athletes who come into the gym, you can have an athlete do a 5-rep max back squat. Say you hit 100 kilos. That 100 kilos should be at least 80% of their best back squat. From there you can go down and hit a 10 rep or go for a max one rep.
Going for the 1 rep max the athlete in this hypothetical should hit 120 kilos to be solid and indicate they are twitchy. The higher the max number may go will be an indication of how explosive the athlete is as an individual. The closer the number is to the 5 rep max indicates the athlete is not as twitchy. You can then cater your programming based on this information assessed.

Stair Jumps
As always, when doing the test you give minimal cues. You want to say a very blanket statement, “Jump up the steps in as few jumps as possible.” You want to notice how the athlete lands and how they cycle their arms. Is the landing soft or loud? Is the arm swing in front or behind the body?
After the first go, give two cues. Assess how the athlete responds verbally. Do they tell their life story or do they just go and do it? The second time through the test, you will notice the athlete doing better.
Some athletes might even say one cue back to you. That will show you they pay attention and are learning. You can take every input for a bunch of feedback to help in developing an initial program.
Endurance Work
There are a couple of different ways you can do an endurance assessment. You can have an athlete go on an assault bike for 2 minutes and hold an RPM for the entire time.
You can also have an athlete do a superset or tri-set to see how many sets for the athlete to lose their form, say they look like they're dying, or look like they're dying and say nothing. All of the information helps you learn how the athlete is wired. It will help you learn the athlete’s endurance capacity as well.
You want to remember a couple of key factors behind the assault bike test. Looking at the test, you can see the assault bike computer read out to give you much of the information. If you or the assessed athlete can’t hit the goal, it will be something you need to work on if it is part of their sport.
If it is not part of your sport, you can plan it out to be effective but not dwell on it. The information will help you move forward, but won’t be detrimental. The test might just show you how quickly an athlete breaks down with their form. You may also notice an athlete should be in an endurance sport instead of a power sport.
Recap
Keep the assessment simple. Do things that tell you things about an athlete structurally. Do things that show muscle relationships. Do things that show you the athlete’s twitch type. Do things that give endurance capabilities. And remember to pay attention to how the athlete responds to the minimal cues.
But don’t let it take up too much time and stall your training. Do the assessment and move into training.
When it comes to the cleanest supplements for our athletes, we only trust Earth Fed Muscle! Check them out.
Related Posts
Blog Topics

Yo, It's Dane
Welcome to the Garage Strength Blog, where it is my goal to provide you with the experience and knowledge I've gained in the strength and conditioning world over many years of learning from both successes and failures. I train elite-level athletes in a multitude of sports from the high school to professional levels, already producing 5 Olympics and 30+ National Champions. If you want to be the next champion I train, check out my strength programs below!
Start Training With Me

Join for free educational videos EVERY WEEK on strength coaching and athletic performance


